Content Variables and Formulas Solution Guide
Below are the most common use-cases for using content variables and formulas to personalize your emails and create smart instructions.
Personalized instructions
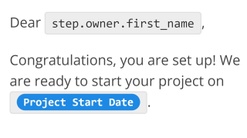
A common use-case is personalizing the subject line, title, and instructions. Personalized subject lines are extremely effective at providing users with context and increasing your open and view rates.
Mary, it's time to get started on your 2021 taxes for Apollo Group.
Mary, your installer will be arriving on-site on Wed, Jan 26, 2022.
It's time to get started on your corporate taxes.
Your installer will be arriving on-site soon.
- Use
{{step.owner.first_name}}to personalize using the step owner's first name - Use
{{field[my_field]}}to personalize using a form field value, ex: company name
Example

{{step.owner.first_name}}, it's time to get started on your {{field[Tax Year]}} taxes for {{field[Company Name]}}
Conditional text
Another common use-case is showing conditional text based on form field value(s) from a questionnaire or intake form.
For example, once the user completes the questionnaire, show instructions that are specific to the user and their specific situation. This minimizes the amount of text users have to read and eliminates confusion, because irrelevant instructions aren't shown.
Our standard turn-around time is 2 business days plus any rush charges.
Our standard turn-around time is 1 week for standard orders. For rush orders, our standard turn-around time is 2 business days plus any rush charges.
Conditional date calculations
Another common use-case is performing date calculations based on form field value(s) from a questionnaire or intake form. Common use-cases include:
- Calculating payment due dates based on payment plan selected: NET 30 vs. immediate
- Calculating delivery dates based on order type: standard vs. expedited
Your payment is due: June 1 (30 days)
Your payment is due: immediately
Your payment is due within 30 days if you're on the NET30 plan or is due immediately if you're not.
You can use any of the conditional content formulas for this:
- Use
IfField()to show specific text based on a condition, otherwise, show the default text, if any - Use
IfFieldYes()to show specific text if the form field value isYes, otherwise, show the default text, if any - Then, use Date Calculation Formulas to perform the calculation
Example

{{step.owner.first_name}}, your payment is due {{IfField('Terms', 'equals', 'NET 30', AddDays(ParseDate("field[Placed on]"),29), 'immediately')}}
Conditional links based on a form field
When linking to things, you may want to change the link destination depending on answers from a form. A common use-cases include:
- Linking to different DocuSign documents depending on what customers purchased
- Linking to different payment links depending on what customers purchased
- Linking to different payment links depending on what customers' urgency, ex: standard vs. rush
You can use any of the conditional content formulas for this:
- Use
IfField()to show specific text based on a condition, otherwise, show the default text, if any - Use
IfFieldYes()to show specific text if the form field value isYes, otherwise, show the default text, if any
<a href="https://demo.docusign.net/PowerFormSigning.aspx?PowerFormId={{IfField("Rush Order?", "equals", "Yes", "GC57LJHG", "23JV46GX")}}">eSign Agreement</a>
Conditional text based on a Yes/No form field
Showing conditional text based on Yes/No questions is very common, ex: you want to show specific verbiage to the user if the order is rushed.
- Use
IfFieldYes()to show specific text if the form field value isYes, otherwise, show the default text, if any
Example

Our delivery time is {{IfFieldYes("Rush Order?", "2 business days plus any rush fees", "1 week")}}
Date calculations
Another common use-case is calculating dates based on form field value(s), similar to what you can do in a spreadsheet. Showing calculated dates HIGHLY recommended because users no longer have to calculate dates mentally, and you can eliminate all the instructions associated with date calculations.
It makes your instructions clearer, more readable, and it's a key component for creating smart instructions for your users.
Based on your Go Live date of Fri, Jan 28, 2022:
- Final draft due Mon, Jan 31, 2022
- Final test run on Wed, Jan 26, 2022
Based on your Go Live date:
- Final draft due 4 days before your Go Live date
- Final test run on 1 day after your final draft due date
Add or subtract days
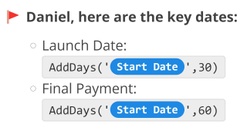
A common use-case is calculating dates before or after a specific date based on a form field value, ex: calculating due dates based on a Go Live date.
- Use
ParseDate()to convert the form field value to a date - Use
AddDays()to add or subtract days - Use
FormatDate()to format the date, see reference guide
Example

Based on your Go Live date of {{FormatDate(ParseDate("field[Install Date]"), "ddd, MMM dd, yyyy")}}:
• Final draft due {{FormatDate(AddDays(ParseDate("field[Install Date]"),-4), "ddd, MMM dd, yyyy")}}
• Final test run on {{FormatDate(AddDays(ParseDate("field[Install Date]"),-3), "ddd, MMM dd, yyyy")}}
Date formatting
Formatting dates for readability is very important, especially because different countries use different date notations. So, to avoid any confusion, it's best to show formatted dates in your subject lines, titles, and instructions.
The installer will be on-site on Wed, Jan 26, 2022.
The installer will be on-site on 1/26/2022. (US notation)
The installer will be on-site on 26/01/2022. (EU notation)
- Use
ParseDate()to convert the form field value to a date - Use
FormatDate()to format the date, see reference guide
Example

The installer will be on-site on {{FormatDate(ParseDate("field[Install Date]"), "ddd, MMM dd, yyyy")}}
Content formatting
Display form field values
Displaying form field values as part of the step instructions saves time for everyone, because you don't go somewhere else to lookup the actual values. The instructions has everything you need to get started.
The client video requirements are:
- Topic: Data Privacy
- Color Requirements: Black/White
- Duration: 3mins
The client video requirements for topic, color, and duration can be found in the attachment on page 3.
- Use
{{field[my_field]}}to display the form field value, ex: video length
Example

Client video requirements:
• Topic: {{field[Topic or Headline]}}
• Color Requirements: {{field[Graphic Color Requirements]}}
• Duration: {{field[Video Length]}}
Encode form field values in links
When creating links with form field values, it's possible that you need to encode your values.
For example, if your form field values could have any of these special characters (?, &, +, #, etc.), you need to encode your values, otherwise, your link will not work due to having these special characters.
- Use
UrlEncode()to encode form field values for links
<a href="https://demo.docusign.net/PowerFormSigning.aspx?PowerFormId=f0d37243&Signer_CompanyName={{UrlEncode("field[Company Name]")}}">eSign Agreement</a>
Show progress bar
Users love progress bars. They give users a visual cue on their progress and set proper expectations for how much work is left. The closer users are to getting to 100%, the more motivated they are to completing.
Anytime you are asking users complete multiple steps in a row, you should add a progress bar to help the user maintain momentum.
Progress
Daniel, you're almost done! As a next step, please upload your past 2 years of tax returns.
Daniel, you're almost done! As a next step, please upload your past 2 years of tax returns.
- Use
ShowProgress()to show a progress bar: web and email only.
{{ShowProgress(3/4)}}
Turn links into buttons
Creating buttons, instead of using text links, is important when you need to focus your user's attention on an action. Many users today just skim text, especially in email, so text links can easily get lost.
So if you want to make sure your users take notice, use a button instead.
Daniel, since you are using Quickbooks Online, as part of the setup, please invite us into your Quickbooks online account:
Daniel, since you are using Quickbooks Online, as part of the setup, please invite us into your Quickbooks online account:
- Use
ShowButton()to turn a plain link to a button. Note, the color of the button is your brand color.
Example

{{ShowButton('https://app.qbo.intuit.com/app/homepage', 'Log into Quickbooks Online')}}
Next Steps
Are you manually sending customers emails with key dates or schedules? Here's how to automate that with Pipeline Content Formulas.

Use the Content Variables and Formulas reference guide to build your smart instructions.
Wondering why your customers ignore your emails? It could be that your customer emails are generic and impersonal. Here's how to fix that with Pipeline Content Variables.